A photo can be sharp, colorful, and perfectly exposed, yet still feel weak. Most of the time, the problem is not the camera. It is the arrangement inside the frame.
When I think about how to compose better photos with simple rules, I focus on one question before pressing the shutter: where should the viewer look first? Once that answer is clear, the photo becomes easier to build.
Composition means arranging people, light, space, lines, and backgrounds inside your frame. You do not need expensive gear to improve it. You need a few repeatable rules and the discipline to slow down for five seconds.
Why Composition Fixes Boring Photos Fast
Beginners often chase better lenses before fixing the frame. I made that mistake too. I used to zoom in, shoot quickly, and hope the image worked later. The results looked busy because I had not decided what mattered.
Good composition removes confusion. It tells the viewer where to look, how to move through the image, and what feeling to take away. A simple street corner can look cinematic if the subject, shadow, background, and timing work together.
That is why learning how to compose better photos with simple rules gives faster results than buying another accessory. Your phone, mirrorless camera, or DSLR can all produce stronger images when the frame has order.
Start With the Rule of Thirds
The rule of thirds is the easiest composition rule to use because most cameras and phones already include a grid. Imagine your frame divided into nine equal rectangles with two vertical and two horizontal lines.
Instead of placing your subject dead center, move them onto one of those lines or intersection points. This small shift often makes the photo feel more balanced and intentional.
Where to Place Your Subject
For portraits, I like placing the eyes near the upper third of the frame. It gives the face importance without leaving too much empty headroom. For landscapes, I avoid placing the horizon in the middle unless symmetry is the main idea.
If the sky is dramatic, I place the horizon near the lower third. If the foreground is stronger, I place the horizon near the upper third. This one choice tells the viewer what matters most.
When to Break the Rule
The rule of thirds is not a law. Centering works well for strong symmetry, reflections, product shots, doorways, and bold portraits. The key is intention. A centered subject should feel deliberate, not lazy.
I usually start with thirds, then ask if the frame becomes stronger by centering. If symmetry adds power, I break the rule.
Use Leading Lines to Pull the Viewer In
Leading lines are roads, fences, staircases, shorelines, bridges, shadows, or railings that guide the eye toward your subject. They make the viewer travel through the photo instead of glancing at it and leaving.
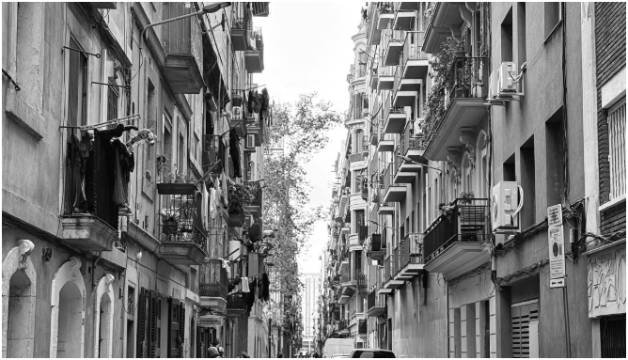
This works especially well in street photography. A sidewalk line can lead toward a person. A bridge can pull attention into the distance. A row of windows can point toward a face.
Real-World Lines That Work
I look for lines before I look for people. On city streets, crosswalks, building edges, railings, and harsh shadows create strong visual paths. At beaches, shorelines and wet sand patterns do the same job.
Implied lines also matter. If a person is looking across the frame, their gaze creates an invisible line. Leave space in the direction they are looking. The photo will feel more natural because the viewer’s eye has room to follow.
Clean the Frame With Negative Space
Negative space is empty or quiet space around your subject. It could be open sky, a plain wall, flat water, a dark shadow, or a clean patch of pavement.
I use negative space when a photo feels crowded. Instead of adding more elements, I remove distractions. A single person against a large wall can say more than ten objects fighting for attention.
This is one of the simplest ways to understand how to compose better photos with simple rules. Give your main subject room to breathe, and the image often improves instantly.
Watch the Edges Before You Shoot
The edges of the frame can ruin a good photo. Bright signs, half-cut objects, tree branches, trash cans, or random hands near the border pull attention away from the subject.
Before I press the shutter, I scan all four edges. If something distracts me, I move my feet, lower the camera, or wait for the background to clear. Cropping later can help, but clean framing in-camera usually looks better.
Change Your Perspective Before Changing Your Gear
Most weak photos are taken from adult eye level. That angle is normal, so it often feels ordinary. A better perspective can make the same subject look fresh.
A low angle can make a person, building, bike, dog, or flower feel larger and more powerful. A high angle can reveal patterns on sidewalks, tables, beaches, and city plazas.
Low Angles, High Angles, and One Step Sideways
One of my favorite habits is taking one step left or right before shooting. That tiny move changes how objects overlap in the frame. A pole can move away from someone’s head. A clean background can appear behind the subject. A leading line can become stronger.
Do not rely only on zoom. Zoom changes framing, but movement changes relationships. When you physically move, the foreground, subject, and background stack differently.
Try Frame Within a Frame for More Depth
A frame within a frame uses objects in the scene to surround or isolate the subject. Doorways, windows, arches, mirrors, tree branches, car windows, and fences can all work.
This technique adds depth because it creates layers. The viewer sees a foreground frame, the subject, and the background. Even a flat scene can feel more three-dimensional.
I like using this rule for travel photos, street portraits, and home lifestyle shots. A person standing inside a doorway usually looks more intentional than a person standing against a plain wall.
Use Light and Shadow Like a Street Photographer
Light is part of composition. It decides what the viewer notices first. Harsh midday sun can look ugly if you shoot randomly, but it can look powerful when you use contrast.
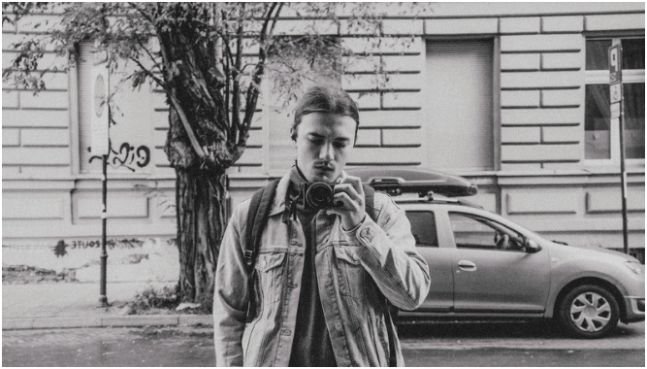
A 35mm prime lens is great for this because it captures people and architecture together. It is wide enough to include shadows, buildings, sidewalks, and movement, but not so wide that everything feels distant.
35mm Lens Composition for High-Contrast Streets
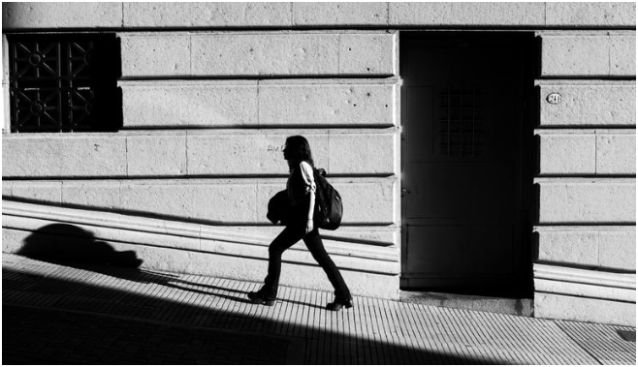
With a 35mm lens, I like using the “stage technique.” I find a bright patch of light surrounded by deep shadow. Then I frame that light using the rule of thirds and wait.
When a person walks into the bright area, they pop against the dark background. The shadows become negative space. The light becomes the stage. The subject becomes the story.
Geometric shadows also work beautifully. Staircases, fire escapes, railings, and tall buildings create sharp lines at midday. I use those lines as leading lines or diagonal grids, then wait for a pedestrian to cross them.
This is where how to compose better photos with simple rules becomes more than a beginner idea. You are not just pointing at a subject. You are arranging light, timing, lines, and space.
DSLR Settings for Midday Shadows
For dramatic street photos, expose for the highlights. If the bright pavement or wall is protected, the shadows will fall deeper and look more graphic.
I usually keep ISO at 100 or 200 for clean files. I choose f/5.6 to f/11 when I want the subject and shadow patterns sharp. Spot metering helps when the brightest part of the scene matters most.
Exposure still matters, so connect composition with basic camera control. If you are still learning manual settings, read this beginner-friendly post on aperture shutter speed ISO tips for beginners before practicing high-contrast shots.
For silhouettes, place your subject against a bright background. Meter for the bright wall, sky, or plaza. The person will turn into a dark shape, and their shadow can stretch toward the camera.
My Simple 5-Second Composition Check
Before I take a serious photo, I use a quick mental check: place, guide, clean, angle, wait.
First, I place the subject using thirds, center symmetry, or negative space. Then I look for a line that guides the viewer’s eye. After that, I clean the edges and background. Next, I change my angle if the shot feels too normal. Finally, I wait for a better gesture, step, expression, or shadow.
This five-second habit has helped me more than any single lens. It slows me down without making photography feel technical. It also works for portraits, travel shots, food photos, street scenes, product images, and family moments.
FAQs
1. What is the easiest rule for better photo composition?
The rule of thirds is the easiest starting point because it helps you place subjects away from the center.
2. How do I make my photos look less cluttered?
Use negative space, clean backgrounds, and scan the frame edges before you shoot.
3. What lens is best for simple composition practice?
A 35mm or 50mm prime lens is great because it encourages movement and cleaner framing.
4. Can phone users follow these composition rules?
Yes, phone users can use grids, leading lines, negative space, angles, and framing the same way camera users do.
Final Shot: Stop Taking Photos, Start Building Them
Better photos are built before the shutter clicks. You choose the subject, place it with intention, remove clutter, use lines, shape the background, and wait for the right moment.
If you want to master how to compose better photos with simple rules, start with one rule per week. Use thirds for seven days. Then practice leading lines. Then negative space. The rules will stop feeling like rules and start becoming instinct.
Your next photo does not need more chaos. It needs a cleaner decision.